We're Designers. We like to Decorate, while we Eat Chocolate.
Showing posts with label Gardening. Show all posts

Tuesday, July 19, 2011

Garden Tour (Continued)

Welcome to my garden!
I love how my pots turned out this year compared to last year.  I love the combination of the purple petunias against the red bricks.

Today I wanted to share the north side of my house.   I finally got it mulched, and am so happy that my hydrangea I put in last year is blooming like crazy. (I had to dig through all kinds of rocks to get it in!)

  Bought it pink,  but I must have the acidic or basic soil for the blue color (anyone know?)  but I love them blue too.

 The astilbes make me happy; adding much needed color in this shady area.  I am planning on moving them over a bit and adding a 1 or 2 more hydrangeas at the end of the summer when they go on sale at my favorite nursery.  (There are a couple of ferns here that are only half alive, thinking about transplanting them to pots...)

Like little pink trees crowning the bushel of foliage below.


I'm wondering if you'd please share your favorite plant?   Plants are our friends!! With just a little care they will cheer you all the day long.:-)

I've been working like a DOG on my laundry room, and I'm  this close to being ready for the big reveal-- stay tuned!

Wednesday, July 6, 2011

Bubble-gum Table


(Pots of lettuce, carrots, and mums)

Somehow I managed to find 15 minutes after spreading mulch and the kids were all occupied with naps or at the neighbors to quickly squeeze in a little spray painting.  

Table BEFORE:

(See how I made this lampshade here)

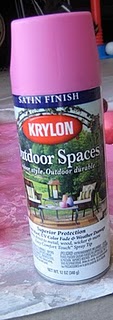
  I used the same Krylon Bubble-Gum paint that I used for my christmas ornaments  (I got this table forever ago at Michael's for  $10).  
The table was weathered, but brought back to life with this fun pink.

Yay for quick projects.

Thursday, June 23, 2011

Summer Garden Tour

I love plants.  They are my friends:-)   I bought a few last year at the end of the season and it just tickles me to see them in bloom! 
This gorgeous Hollyhock has just begun to bloom.


This is the first year we've grown lettuce.

Fast tomatoes!

Here's part of my patio last summer... I just picked up some coleus today.

I would have rows of hollyhocks if I could.
How's your garden growing?

Wednesday, June 1, 2011

{Frugal} Front Porch Fun

I've never really done anything exciting with my front porch so I thought I'd give it a go this year.


Using inexpensive Terracotta Pots I knew I could spray paint them and add my own little touches without breaking the bank.
Here I spray painted the small ones Green Apple from Rust-oleum
p.s. This what your picture looks like when you take it late at night.

Mod Podged with paper and then sprayed with a Clear coat of lacquer. Hopefully, to at least make somewhat water proof.
I had these metal alphabets letters and I took paper clips and unfolded them to make hooks!


This one I put vinyl stickers on.
On the bigger pots I spray painted Lagoon, also from Rust-oleum ( I love teal) and also Mod Podged. This one I added that cute little seed packet to the front!


To make these "rulers" I took the little label cards that come in the flowers from the store and Mod Podged this cute ruler paper over it! Now maybe I will know how my Garden Grows!


FYI. Terracotta pots make excellent chalkboards and even if you spray paint them a color you can still write on them with chalk!


The big pot that I added the "Bloom" too with metal letters is also home to a vintage ruler I had laying around my office.
The number one way to frugal-ize (I'm sure that's a word ;) your space is to use things around the house. I took scrapbook paper and some frames, easy-pesy.


I added this cute frame to this pot by tying the ribbons to the handles.


A bird cages from the thrift store to hold a pot.

Another frame laying the house that finally has a home!


Well, I think I need a new picture but there you go.


The DIY Show Off

The Shabby Nest

Thursday, May 12, 2011

Purple Petunias

OOOHH!!! I am so excited about my plants this year!  This week I got petunia plugs for uber-cheap! See these little trays? Each one had a petunia plant in it.  The tray was 8x16=128 petunias!!
And I got them for $7.  What?!! Last year at the big box store, I paid around $5 for one big wave petunia plant.  Well, not this year suckers!


 Since I got the plugs, they needed to be transplanted right away. Luckily I had a stash of peat pots and old containers that I had saved from previous years flower purchases.
(They already look more comfortable in their new apartments)
Container Gardening Tip:
I usually put AT LEAST 5 petunias in a 14" pot.  (plus greenery to flow over the sides, etc.) Those guidelines of inches to put in between each plan on the plant labels don't apply to containers, cram them in for the best look.

  The last frost date here isn't until the end of the month, so if I do have to bring them in at night it will be easier for me move small trays than large pots.  It took me an hour or 2 just to transplant these.  And there's still 1/2 tray to go!  I love my plants, but now I have to remember to water them... thanks for the rainy days rain!

Wednesday, July 21, 2010

Welcome Friends!

There's something about flowers on the front porch that make me feel cozy before I even walk in the door.  I want to share my front porch pots.  I went with a red/white color scheme, but the sweet potato vine have overgrown my white mounding petunias that are in there somewhere.  Next year I think I will be doing pink and white, and a smaller leafed vine. Here's one just planted around Memorial Day,


 Here they are today (after watering...)

Totally worth waiting a few weeks for the growth than buying the pricey pre-potted arrangements. Not counting the smothered white petunias, I put in one spike, 1 sweet potato vine and 2 wave petunias. Next year when my baby is older I'm going to start my petunias from seed again, and save some dough!   My plan is to use pink and white next year, I think those colors will stand out better against the brick house.

I got these 16" fiberglass urns from Home Depot for ONLY $40 ea!  Similar ones were $80 at Wally-World.  That's why I shop around.   You do have to drill a small drainage hole in them yourself, but that takes about 5 minutes.   The flowers were a little pricey, since I got them at a Pettiti's, so each arrangement cost me $20 (less had I left out the white petunias).  Can't say enough about starting your seed indoors, could've cost me more like $10 ea if I had home grown the petunias.  There's always next year....
Related Posts Plugin for WordPress, Blogger...