We're Designers. We like to Decorate, while we Eat Chocolate.

Friday, July 22, 2011

Bust out the Bikini Bottoms!


I showed the hubby my latest project, and he says "It looks like you hung bikini bottoms on the chalkboard, why don't you take it down and then the room will look good."  HA!!!
(Especially since I don't even own a bikini!)

I grabbed some fabrics from JoAnn's.

Followed this tutorial,  and cut out my triangles, they were 8"high and 6" across.

The two triangles on the right were sewn on the edges with a zig zag stitch, they are double sided.
 After sewing all of them,  I sewed them to a grosgrain ribbon I had and hung them up.

I ended up needing 11 triangles for about 60 inches of chalkboard.

I could iron them, but I kinda like them curvy.
This only took about 2 hours, super easy and cute, I might use it outside sometime for kids parties too.

Wednesday, July 20, 2011

Stencil it up (DIY Laundry Room)

 Countless hours and many nap times and bedtimes later, I finally finished painting my laundry room!

BEFORE: missing pizazz

AFTER:
All stenciled and framed the chalkboard.

  I didn't want to spend $40 on a stencil, so I got some tag board from the dollar store, and used items around the house to create my own stencil.  

To get a nice curve I traced a bowl (then decided on a cup since the bowl was too large).
I folded my tagboard in half first, so that when I cut it the sides would be identical.

 I opened it up and then folded it in half width wise to get the bottom to mirror the top.
With the red stencil, you can see the level horizontal line I drew and overlapped the stencil by 1 1/2" inches to create the pattern.

I tried using the outer part, thinking I would tape it to the wall and paint inside it, but the paint totally got under the stencil, so I ended up tracing the stencil where I wanted it, and using my level and ruler, and traced it out on the whole wall.  (then I had to erase a bit after painting)

Then came the painting.....  each one took about 3 coats of paint, using a small brush.
On all the walls for the background I used Sherwin Williams' Watery.  (I first tried out SW "Rainwashed," but it was too gray under the fluorescent lights).

I was going to use the next color up on the paint chip, Tidewater, and I wanted a little bit more of a contrast, so for the stencil shape I used a custom color (I hate it when bloggers do that:)
  which was just a bit lighter than Tidewater, but not as light as the next shade up.  So the SW clerk entered in a Manual Tidewater color.
I'm so glad the painting is finally done, now I get to decorate the walls and work on the other side of the laundry room.

Linking up to:
Strut Your Stuff Saturday at  Six Sister's Stuff
Modern Country Style Paint Party

Tuesday, July 19, 2011

Garden Tour (Continued)

Welcome to my garden!
I love how my pots turned out this year compared to last year.  I love the combination of the purple petunias against the red bricks.

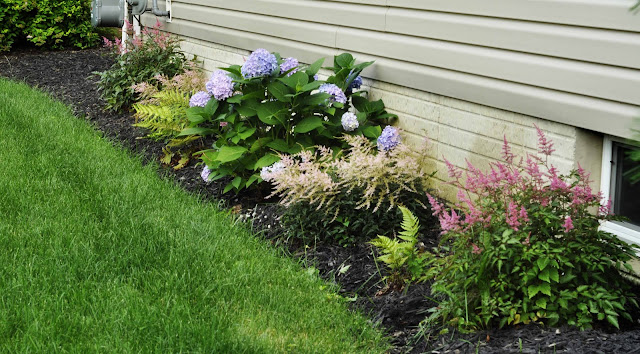
Today I wanted to share the north side of my house.   I finally got it mulched, and am so happy that my hydrangea I put in last year is blooming like crazy. (I had to dig through all kinds of rocks to get it in!)

  Bought it pink,  but I must have the acidic or basic soil for the blue color (anyone know?)  but I love them blue too.

 The astilbes make me happy; adding much needed color in this shady area.  I am planning on moving them over a bit and adding a 1 or 2 more hydrangeas at the end of the summer when they go on sale at my favorite nursery.  (There are a couple of ferns here that are only half alive, thinking about transplanting them to pots...)

Like little pink trees crowning the bushel of foliage below.


I'm wondering if you'd please share your favorite plant?   Plants are our friends!! With just a little care they will cheer you all the day long.:-)

I've been working like a DOG on my laundry room, and I'm  this close to being ready for the big reveal-- stay tuned!

Friday, July 15, 2011

Fireplace "Tile"

Say what?! I'm blogging? I know, unbelievable and about freaking time. My summer got away from me, I've been having a great time vacationing but I also have been working a ton as well so needless to say it's been hard to finish projects! I currently have 2 half re-upholstered chairs sitting in the dining area that have been sorely neglected! I'm hoping though to get those done by next weekend...
And I greatly appreciate Lauren picking up my slack!

Now onto the a project!


Isn't this tile so pretty?

Well, it's wasn't always that way. Here it is, and it's not that bad, but as I've said in the past I am a tile snob (because I work at a tile store helping people design their kitchens and baths and pools and whatever else fun stuff they need) and I was having a hard time decorating because the peachy color of  this tile always threw everything off.

BUT I don't own this house so I can't just tear it out or tile over or even paint over. I had to do something non-permanent.....
Well I've seen people put sayings on tile with vinyl so why not graphics?
So using my Sihouette I cut out these damask decals, if you will, to a little less then the size of the tile.
And Applied!

Turned out great! People who have seen it before asked if we re-tiled, when I tell them "NO, it's vinyl" They're shocked! So, I guess you'd say that's a success!


SAS Interiors


Wednesday, July 6, 2011

Bubble-gum Table


(Pots of lettuce, carrots, and mums)

Somehow I managed to find 15 minutes after spreading mulch and the kids were all occupied with naps or at the neighbors to quickly squeeze in a little spray painting.  

Table BEFORE:

(See how I made this lampshade here)

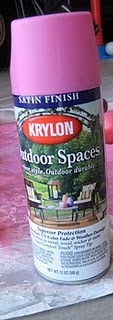
  I used the same Krylon Bubble-Gum paint that I used for my christmas ornaments  (I got this table forever ago at Michael's for  $10).  
The table was weathered, but brought back to life with this fun pink.

Yay for quick projects.

Related Posts Plugin for WordPress, Blogger...