We're Designers. We like to Decorate, while we Eat Chocolate.

Monday, December 26, 2011

Boys' Room Painted Headboards

Though this room is far from finished, I got the painting done and wanted to show y'all!  
 (I'm not from TX but sometimes wish I was:)


My boys are 5 and 2, and so once the 2 year old outgrows the crib (hopefully that won't happen soon), his bed will mirror his brothers'.  


Before:  
When we first moved in.


AFTER:
(updated 1/23/12)


So here's my painted headboards!  First I painted the wall red, that took 5 coats, then  used my level and I cut my own diamond shape out of card stock and traced the pattern on to the wall.  Then I hand painted about 100 white diamonds, using 2 coats of primer and 3 coats of white gloss paint.  I taped around the edges to get a nice white border.  I painted the matching headboard for when my toddler gets big enough for a "big boy bed."
Window Wall View:


I've had the lamp for awhile (from Marshalls), but got some blue ribbon on some christmas presents, and so I used sticky dots to wrap it around the lampshade and tied the ribbon ends together in the back to hold it on.  
I ordered the chevron pillows on Etsy.   I got the duvet cover from IKEA, (I don't think it's available anymore:( )
 I love the pillow combination in this photo, so I'll be adding a bolster and standard sham soon.  (Luckily my 5 year old likes his things "just so" and makes his bed just like I like it so I know he can handle 3 pillows)

Budget Friendly Projects to work on for this room:
*Buy blue standard shams for each bed, saw some at PB kids.
*Sew a blue and white stripe bolster pillow
*Toying with the idea of a roman shade with a white ribbon or greek key detail...(the window treatment now is a flat sheet bunched up with ponytail holders on the back and safety pinned around the curtain rod.)
*Artwork for over the dresser in simple white frames.
*A simple moulding to trim out the headboards.

Wishlist:
*Board and batten for the room.
*Get a new dresser- thinking of a red one from IKEA or one with a dark walnut finish. (to replace this cheapy we've had forever from Target.)

This project even got the hubby's approval:-)
Monday, October 31, 2011

Dinner in a Pumpkin


Last min dinner ideas for Halloween!
Dinner in a pumpkin is what I grew up eating on Halloween Night.
Here's the recipe

INGREDIENTS
1 small-med pumpkin
1 can mushrooms, sliced and drained
1 onion chopped
1 can cream of chicken soup
2 Tbsp Veg. oil 1 1/2-2 cups cooked rice
1-2 lbs ground beef
8 oz. sliced water chestnuts
2 T. soy sauce
2 T brown sugar

Preheat oven to 350 F.
Saute onions in oil until tender. Add meat and brown. Drain the meat. Add soy sauce, brown sugar, mushrooms, and soup. Simmer 10 min, stirring occasionally. Add cooked rice and water chestnuts. Spoon mixture into pumpkin on baking sheet. Bake 1 hour or until pumpkin meat is tender.
Serve, scooping out pumpkin with the meat mixture.
Serves 6.

* You can do this with a pumpkin that has been painted with acrylics or permanent marker.


I'll be serving this tonight with these yummy hotdog mummies!

Thursday, October 20, 2011

Mad Scientist Book Case

This is what I imagine you'd find in a Mad Scientist's....lare? At least a Mad Scientist who had some sort of secret love a decorating. Like maybe Gay Mad Scientist.

Dr. Frankenstien, Dr. Jekyll and Mr. Hyde and maybe even Evil Dr. PorkChop (toy story) are all pupils here.
My take on Bat Specimen. Loved making it and super easy!
Beaker bottles came from Target years ago, but I added the labels. Martha S. stickers I got at JoAnns.

Dollar Store Skull that needed a make over, and no Mad Scientist lab is complete without a lobotomy diagram either. So I went online and drew my own on the skull.
(and no Gay Mad Scientist lab is complete with out floral wall paper)
Eye Balls in a jar, more Dollar candy. They say "gourmet chocolate" on the package but who are we kidding? Last time I checked gourmet truffles don't have blood veins on the wrapper.
This adorable eye chart comes from Tatertots and Jello. It's a free printable! Check it out HERE
Mad Scientists! Classes start next fall!

Saturday, October 15, 2011

Front Porch Pumpkins

The start of my front porch! I have always loved the "topiary pumpkins" I saw them in a magazine many many years ago! I was so excited to FINALLY be able to do them!
They are just so cute and festive!


(and they go with my Ombre Fall Wreath)
I added a little ric rac to the pumpkins for Halloween. Ric Rac is the black zig zag ribbon on the bottom pumpkin. I love ric rac...I have images chevron pattern dancing in my head.


I put a dab a glue at the top and a dab at the bottom so I can hopefully pull it off for next time.


The yellow pumpkin is sooo cool! I found it in the big gourd bin at Walmart.
I also added some small green ric rac to the small white pumpkins!


I did the same method with this lace that I put on these pumpkins that are on my Witchy Matle.


Thursday, October 13, 2011

Use What You Have- Fall Decor

Fall decorating in the foyer using what you have around the house.

Plate from my dining room  (Marshalls)
White Pitcher- Ikea (borrowed from my guest room)
Orange Bow made from leftover fabric.
Glitter leaves from my Christmas tree topper.
Little witch sign I already had.
Berry wreath- Giant Eagle- only $15!

Black Spiders-made easily from black puffy balls, pipe cleaner legs and googly eyes.


Added some Halloween to my entryway topiary.


Outdoor front porch mums are blooming.

Looks like my other dollar store tombstone blew off... :-)
  These were $5 mums from Pettitis, I'll plant them in the yard later.
I tried to decorate more for fall, so that most of my vignettes will last until Thanksgiving.  Happy Fall!

Tuesday, October 11, 2011

My Witchy Fireplace

Need any spells brewed? My Halloween Mantle. I love how every year there's a new color that's introduced to the original Orange and Black. Years ago it was purple, then lime green, then last year, white and now Aqua. And can I say I'm LOVING the Aqua this year!
No Halloween house is complete unless it has a black tule tutu.
2 supplies: 2yards of Tule and a stitching hoop, Medium size was mine.
3 steps: cut tule into random 2"x6-2"x8" strips
tie to hoop
push close together
*hang by ribbon if desired!
Metal witch hat and my pumpkin on a candle stick. I glitzed up with some lace. I will show you more glitzed up pumpkins in a future post.
Yeah, my spells are cheap but you'll pay for it in the end!! hahahehahea (evil witch cackle)
Witching spell books.
I think I need to find a cauldron to make the transformation complete!


Friday, October 7, 2011

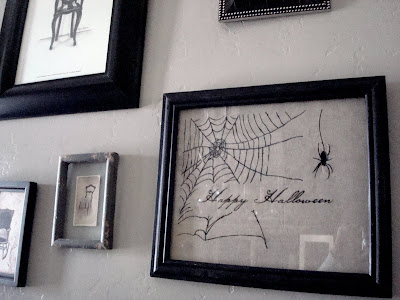
Spidery Gallery Wall

My little spooky welcome for my guests. I did this last year too, but of course it's a little different this year....
The pictures of chairs and the chairs I keep up all year but come Halloween I like to make them a little more creepy. I love Halloween!


again, this is drop clothe that I wrote this on...


The "EEK and the "BOO" I cut on my Silhoutte and framed.
Agh! Who is that sicko in the reflection...oh it's me. haha.
This cute cross stitch I bought last year but I bet you could easily DIY it.


You're welcome any time! Just beware of spiders and this time of year I'm being serious. I think I smash about one a day.

Related Posts Plugin for WordPress, Blogger...