We're Designers. We like to Decorate, while we Eat Chocolate.

Monday, September 27, 2010

"Along came a Spider and Sat Down Beside Her"


Another Halloween Post, yeah, get use to it, I'll probably post one a day this week so ya'll can get busy decorating for the holiday! You're way behind! I started last week! OK, maybe I'm just more of a Halloween spaz than you.


This is the entry way of my house.


I've been collecting chair pictures for awhile, some I made and some I bought. I decided to corporate them in a Halloween theme

.


The theme being "Along Came a Spider and Sat Down Beside Her"


I made this "Boo" sign on a cricket machine, and then framed with a thrift store find.


Also made the EEK sign.

Notice the spider pic below.....

So I had a friend do the vinyl for me.


And I used the negative of a vinyl as a stencil and traced in on some canvas and draped it over the chair. I wanted to write it on the chair but that may have been taking it a bit far!


Then added this spider "captured" in a cloche.

The End. One of my favorite places in my house!


Look for link ups "Join
">here

Saturday, September 25, 2010

Halloween Bats

A (mostly) free Halloween project you can do in a day! Something even the kids can help you do. I went on a little adventure with my son to find the branch. We didn't have to go to far, my neighbor ended up having a down tree in front of the their home!

So I say mostly free because you may have to buy some cute paper if you don't have any laying around. I used different black and white & black and tan printed paper.
I free handed the bats, I kind of used the Batman logo as a resource.

The vase I already owned, you can use anything you have too!

I tied them onto the tree using twine, you could even use fishing line if you wanted.

A Halloween mantel in the making!

Wednesday, September 22, 2010

"TIME" For a New Post!

I'm a dork with my post titles, I know.
I took a break from unpacking and cleaning my house to finally do a post, a sacrifice I was willing to make! It's just a quick little post on clocks, don't know why, but just is.

I saw this at a home decor store. LOVE IT!!!!! This picture is a little deceiving, it is quite a large piece. It's wood planks and the clock pieces are metal (I believe, couldn't touch it was too high) wish it was mine!!


Time Zone. This I did in my old house, in our office. Just some clocks and had the vinyl made. Super easy.
Not quite sure how this done since the top of the picture was cut off but I loved it so had to post.

Cute quotes around a clock. See www.bloomingwords.com to order.

A plate turned into a clock. Cute! You can buy simple clock kits like this at most craft stores.

A clock stenciled on the wall, see here to learn how to do!
Enjoy!

Tuesday, September 21, 2010

Meet the Girls

Here's the ladies I found for a mere $3.50 each at the Goodwill last week.

Before:


Enter my friends Krylon Primer and Krylon Blue Ocean Breeze.  


Enter this old accordion lampshade, transformed with fabric I cut into curved strips and hot glued on to create a feminine petal type shade.

Lamp Shade Before :


Shade meets Base:


2 lamp bases -$7, 1 can spray paint $3 (already had the primer), 1 old lampshade-free.
I was checking out light fixtures at Target, and would have spent around $50 bones for the same size lamp.  I'll stop sitting in the dark for ten dollars:-)  We could all use more light in our rooms.   Have you used spray paint on anything lately?

Friday, September 10, 2010

Just Do It!

photo1
Closets are an interesting place.  A place we all use everyday. Our closets make our lives easier, or more difficult.  I stayed up late over Labor Day weekend and was totally inspired by this article, to burn everything in  gut my closet.  Now, we've only lived here for 2 years, but a lot of old stuff moved here with us.  I have organized it once or twice, but this time, I was going to be ruthless.  ("but that shirt was cute!" or "I'll keep it even though it doesn't fit quite right"). No, there will be no more crap jammed into my closet that hasn't been worn in the last 18 months.  I wasn't going to make excuses for things I didn't LOVE.  For example "it still has new tags, I could sell this on ebay."  Well, I had the last 18 months TO sell it on ebay, and I didn't. Adios la ropas!
Note: to those fellow frugalistas, don't worry, there was only about 3 items that fit that description. Hopefully it will make someone's day at the goodwill when they see it.
These thoughts were poignant from The Lucky Shopping Manual:
"If a piece doesn’t work, look at it this way: You paid for it once in cash, and now you’re paying for it in valuable closet space. If it’s not right for you, bite the bullet and let it go."
“Don’t save a pair of jeans for that anticipated five-pound weight loss. Owning them is bad for your psyche. If the time comes when you drop a size, chances are you won’t hesitate to run out and buy a new pair”
photo2
I was watching Rachel Ray with her guest Erin Rooney Doland, author of Unclutter Your Life in One Week.  One of her ingenious organizing tips was to buy all the same color socks.  That way you are not wasting time matching pairs.  While I still have to match different age kids' socks, I thought that would be fantastic for husbands socks! Why do they need all those different designs on their tan/brown/blue/black/gray socks that no one sees anyway!  I could easily shorten my laundry chores by getting all the same black and brown socks.
Warning--those Martha's out there--Turn Away!
One of my friends informed me she doesn't even fold her husbands clothes, she just stuffs them in the drawer! I was shocked at first, but I admit after hearing that I seem to have justified occasionally following in her footsteps.  (I mean really, sometimes you are out of time, and want to be finished with the bazillion loads of laundry each week!) 
[I may or may not have heard a complaint about that. *wink* let's not sweat the small stuff, mm-kay?]
One tip I'm sure you've all heard before, (that's me patting myself on the back), is color code my hanging clothes.  It only takes about 1 minute to put clean clothes  away in their colored area, and it makes finding what I want to wear each morning sooo much simpler.  Not only that, I like it when things look pretty... that's how I get my kicks:-)
photo3
In my 13 gallon bag that will be donated, I  packed clothes that weren't comfortable, old,   clothes  that didn't make the modesty cut (or didn't look very flattering when layering them to look modest), sandals rarely worn (I have 3 favorites which I wear constantly) and uncomfortable socks (maybe someone else will think they aren't?).  I did have a few t-shirts with sentimental value that we bought on different vacations, like my little hawaiian t-shirt when I went there with my mom, and my t-shirt I got on my honeymoon in cancun, but remember, I was in the ZONE.  (And I might have shrunk them in the wash....) I don't regret it at all.  (I did keep my cute cancun woven blouse, I'm not heartless:-)
photo4
I disposed of a broken hanging plastic shelf organizer.   All but 3 shelfs were ripped, so all the clothes I stuffed in would pile up at the bottom.  Unacceptable!   Other items that ended up in the trash were  annoying hangers, hole-y socks, and some stained shirts.   I also took the time to bring out my winter sweaters, hang up jeans, and pack away a few stray maternity items.  
It's not only my closet that got organized, but a little part of life.  Somewhere on my to-do list is decorating it, but let's just start with the small stuff.
photo credits: 1&4 InStyle-Sheryl Crows, Mariah Careys, 2 & 3 Better Homes and Gardens
Thursday, September 9, 2010

An Old Door, on a Wall, In a Hall

Sigh! What a month! I love September but it has been so crazy, and now I have my sons birthday party in 2 days and I'm leaving for Virgina in the 2 days after that! So I'm sorry my posts have been late! I think this one was worth the wait (hopefully)!Down my hall I hung this old door and dressed in up in few different ways...
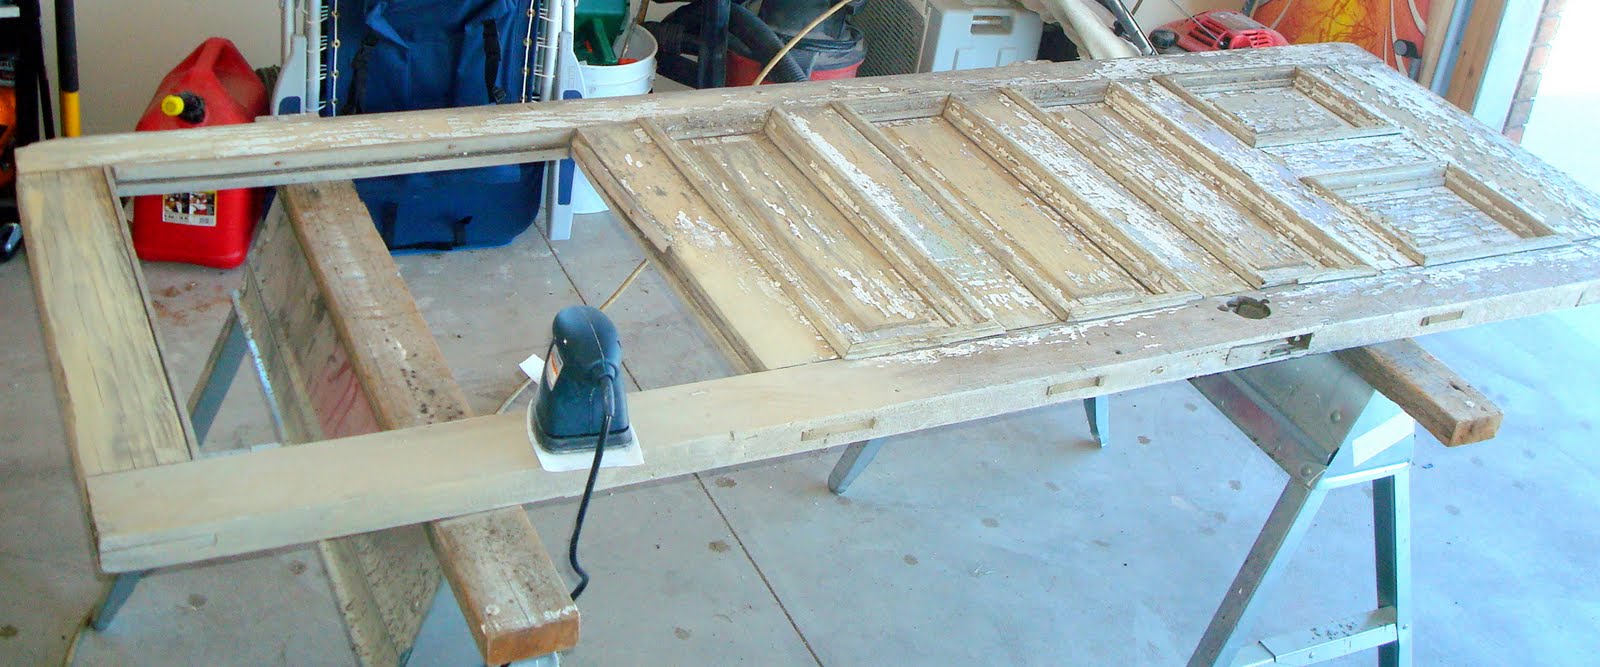
So the story of this door is that I was at my sisters house enjoying my nephews birthday party when I noticed this door outside her neighbors house. In the backyard, just sitting all alone. I immediately had visions of creativeness dancing in my head! My awesome dad worked his charm and the neighbor was more than willing to give it away!
So I did a lot of sanding, and little painting.......


Later on I found some cabinets that I thought would look cute above the door.
I bought these paper dollies.....

And Mod Podge them on there.

So here it Is! I took pictures of how I hung this huge, super heavy door, but once again they were deleted off my camera. So to explain, we used these metal brackets called Z-bars. You screw one to the wall and one to the thing you want to hang, then they interlock. It's the easiest, and the least damage you could make to the wall for hanging heavy things.

So I thought these panels could use something cute and maybe something different, So I mod podged some paper and painted the edges.
Then, I hung some family pictures in the places on the door that were missing panels.
Lastly, I hung the cabinet doors above the door....I think I'm also going to hang pictures from the cabinet doors.
It's still a little bit of a work in progress but there you go! It's fun. I like it.

Tuesday, September 7, 2010

Back to School Treats!

My friend got this idea from gourmetmomonthego.com. So late one night we decided to make them! And that's probably why mine aren't as pretty and probably why I didn't take enough pics. But I did have fun in my jammies!

Go to this link to download the labels that you wrap around the "crayons" then print it out on the same colors of paper that you're dipping your chocolate.


Instructions for dipping:
Pretzel rods, break in half.
Melt melting chocolates or baking white chocolate.
Add food coloring to white chocolate (after melted) if you don't use colored melting chocolates
There are 2 ways you can do it. Dip the ends like she did or I dipped the whole thing like I did. Probably over kill but it tasted good!
Let the chocolate harden on wax paper

Wrap the rods in paper after chocolate has hardened. SO CUTE!!! The kids can totally help out with the dipping OR you could do it while they were at school and have a snack for when they get home OR make as a gift for a teachers!

Friday, September 3, 2010

Guest Room Design

Much Needed Makeover
A peek at my guest room in progress.

 Blue and I are friends again, after an awful separation dating back from the 80's.  Blue tells me he's changed, and promised he wouldn't get dusty or invite his friend "mauve" around. The paint color is "Salt Glaze" by Martha Stewart (looks gray in the photo but is really a pale blue).  I am sticking to a monochromatic color palette of blue, black & white.  I found the lamp at Marshalls, white pillows with shams at Target. I threw in the two simple accessories before our guests arrived for the weekend. [the clock is from PB for our wedding, and small pitcher came with our dishes].  I purchased a mixed bouquet and nabbed a few of the roses for this mini-pitcher to brighten up the corner.  I threw a yard of fabric I had over an old nightstand.  I think it looks pretty serene.  I love walking by the room, (I think it's even prettier than my master bedroom) it also serves as my craft and sewing room.  Other projects I am working for this room are: spray painting the other lamp white, a lampshade makeover, paint the desk chair, and ruffling curtains.  More photos to come. 

Wednesday, September 1, 2010

Dresser Makeover

About 2 years ago my mom gave me this dresser (mine when I was a kid) circa 1988 or so.  I knew it would be perfect for my daughters room.  Nothing a little paint can't fix.  At first I thought of getting new hardware, but then decided to spray paint the brass pulls nickel instead.


 Free furniture is in my budget, so I got out the paint and went to work.
I'm pretty happy with how it turned out, although I did have one mis-hap... I managed to loose one of the drawer pulls! whoops.  I think I may have thrown it away when I thought I was going to buy new hardware... [note to self, don't throw anything away until project is completed] It's easy to change my mind over the course of a makeover-- just wait until you see how many times I painted my bathroom in 2 weeks! (let's just say the hubster was not thrilled with that:-)).  I got some cute place mats on clearance at Dillard's for the top of the dresser. The lamp I got at TJ's HG.  Frames were purchase a long time ago at wallyworld. I'd really like to find a great big mirror to hang on the wall above it [I need to go garage-sale-ing].  I'm mostly happy I don't have to spend money on a new dresser when this one works just fine, Thanks mom!
Related Posts Plugin for WordPress, Blogger...