We're Designers. We like to Decorate, while we Eat Chocolate.

Tuesday, April 26, 2011

Easy Flower Ball Accessory


Here's my version of these cute flowers balls I've seen around lately, I put mine on top of this silver candlestick from PB.
First, I found some small  pink roses at Michael's for 88 cents a bunch, I bought 6. Instead of  buying a styrofoam ball I  decided to use an old ball accessory I wasn't loving anymore.

Materials: Ball of some sort, flowers, wire cutters, glue sticks and hot glue gun.

  Then I got my wire cutters and cut all the flowers off the stems and hot glued them onto the ball.

This was a little time consuming,  but I think it was worth it since I was able to create just the color accessory I wanted. 

Sunday, April 24, 2011

Easter Left Over Ideas!

Easter Candy overload at our house! What about your's? I found these ideas on different websites, tried some and they are great so I wanted to share.
Disclaimer: I didn't invent any of these but I'm just sharing because they're so yummy and I love!

Cute monster eggs decorated by my son, also a monster.

Took those little eggs and turned them into an Egg Salad BLT! Um, yeah you heard me right and boy was it "tasty" (as my 3 year old would say). The recipe comes from Our Best Bites.
If have not discovered ourbestbites.com you must! It's a great website with delicious and do-able recipes. Plus they give you great healthy options too. For example, she's created a delicious dressing to mix with the eggs instead of just mayo. Check it out HERE.
I am asking for their new Recipe Book for Mother's Day.


NEXT- Who? WHO?! I ask you, does not love these?! I think we all run to the store the day after Valentines to grab the first fresh bag off the line. And once again Our Best Bites has come up with a genius way to turn them into something even more delicious (yes, it's possible).

Chop some up and..

Make them into cookies. Oh, so good! It's like gooey and crunchy at the same time!
Get the recipe HERE
note: Get use to me posting a lot of recipes from their site. I love it!
This one goes out to my "Peeps"- I love Smors, they're just about my all time favorite treat. So of course I went gaga over these at RootsAndWingsCo.blogspot.com

It goes a little something like this.

*Crush up a package (a sleeve) of Graham Crackers with 1/3 c. of brown sugar and pat down in a 9x9 pan.
*Mix 1/2 cup of melted butter and 1 tsp. of vanilla and pour over the graham crackers and pat again.
*Pour 1 1/2 cups (or however many you want) m&m's on the graham crackers
*Then top with Peeps.
Bake at 350 degrees for 15 min. Cool and cut into bars.


Say What!?

Ok, can you believe somebody actually went there? A Cadbury Creme Egg INSIDE a cupcake? I have not tried this for fear of loving them and having to run 10 miles a day just to burn off the 1000 cal. I'm sure they're worth.
I haven't been able to find the recipe again, just these pics at Zoecakes.com. But from what I remember it's basically chocolate cake batter in a cupcake than place a Creme Egg on top. The cake will cook around the egg.
I imagine that the Chocolate Cake recipe would need to be a dense and fudge like for it to be truly remarkable!


It's been topped off here with a Butter Cream frosting, and look at the way the creme solidifies! Oh man, my thighs are getting bigger just thinking about it. Add this to my list of things to try

Friday, April 22, 2011

Re-Purpose Frames

Ghetto Frame:
In the long process of deep-cleaning out the house, I came upon this old accordion frame buried in a box in the basement.  No longer my style it almost made its way into the garage sale box.

 I unscrewed the hinges,  added wall hangers to the back, updated the photos inside, and used a bunch of my other mis-matching brown frames to create this collage.
(I turned 2 of the 3  5x7 frames horizontally)

 I simply laid them on the floor below the wall until I found an arrangement that I liked,  then hung one and eye-balled the next one as I hammered in the nails.  (I still want to update some of the art in these, but that's another project.)  So you may want to think twice before you throw away your outdated frames.

Friday, April 15, 2011

Part II. Suitcases


This is part II of my suitcases, go HERE to see part one!
The labels on my suitcases are done! It didn't take me long, but like with most things I got distracted. Plus it's been so nice outside I haven't really wanted to blog. I got my first sunburn today!


So I guess working my way down from the top. On my lables I found these cute frames that already had pictures in them and were sticky on the back. So basically a sticker, but they're so much more than that! Look how cute. I don't scrap book but sometimes I wish I did because some of the stuff is so cute. Anyway, I digress! I used the "sticker" that had a picture of an old phonograph and the letters "C" and "V". This one holds CD's and VHS, stuff I don't want to quite give up yet!
Oh and I finally finished putting the vinyl on the black one. Here it is! Honestly, I would use it on my next trip. But then of course I would probably ruin it,so it's quite the conundrum.


The red one is also a favorite. I decopodged it with paper, if you haven't checked out the other post yet.
The "P" is for Photographs. Mostly duplicates, but don't worry, I have also burned them onto C.D's and in my firesafe. Tip of the day!

The "T" is for Toys.


This is a man's briefcase that I decopodge on this awesome paper, it kind of has a sketchbook/college fill to it.


It holds old magazines that have so much good stuff I can't bring myself to rip apart just yet!

The "Yellow" one that I painted has a "D" for dress-up.

The teal one holds our old Yearbooks....awh memories.
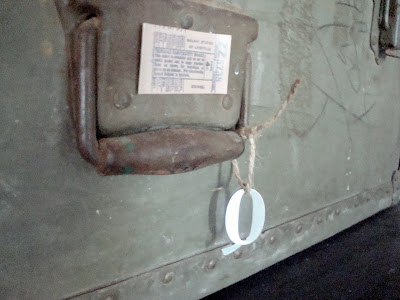
This footlocker my husband's Grandpa took to WWII, now holds Quilts. "Q"!

So there you go! Basically old stuff holding more old stuff.


Visit thecsiproject.com

Design, and Dinner, Follow Function

Please Excuse the Interruption:


 I was reading this great book (available at your local library), called House Works.  It's all about organizing your household, and getting it to work for you.    This January I knew something wasn't working for me, and frankly--
I've had ENOUGH!  
It was my dinners.  We've all heard the saying,  "If you fail you plan, you plan to fail."  I'm sure lots of you may identify with the feeling of peering into the pantry scrounging up dinner 1/2 hr before the hubby gets home.  Sometimes I'd plan ahead, and I'd always make a shopping list, but not with a real plan.

So...I did it.

Did what you ask?

I spent a couple hours, planned, gathered recipes, and typed up 
Dinner Menus for 5 WEEKS!

I couldn't stop there.
I typed up the coordinating 
Grocery Shopping List for each week!

(Boo-yah!)


Easy stuff that tastes good, that kids like, not weird, hard to make things- I might add:)
[Some recipes I got from the Campbell's Cookbook, others from Weight Watchers 15 min meals,  others  are family recipes.]

And if anyone wants to make their life easier,  I thought I would post them here on the blog so you can print them out.  Let's get your house functioning for you.  I want less stress and more time to work on other projects when I have my meals planned, and family fed on time.  (and as my husband likes to remind me, "The way to a man's heart is through his stomach.")

  I'm already loving how I feel having dinners on the table.  I started Week:1 this past Monday.  So I'll share with you Week#2 for next week, and put one up a week for the next week (for 5 or 6 weeks), if you'd like to plan a long.


Put the Menu on the fridge, and take the shopping list to your pantry and check off the items you already have, then add your breakfast/lunch/snack items and you're ready for the store.

Good Luck! May the Food Force be with you!:-P

Thursday, April 7, 2011

Non-permanent Kitchen Backsplash


BEFORE
This is the kitchen back splash in that house we're "renting" (I use the term "renting" loosely since it's actually my parents second home that we're living in while my husband finishes school)
So I'm not saying that I don't like this BUT one thing you may not know about is that I'm a BIG tile nerd! And since I have access to something more fun tile I just had to do it.

I found this board for only Uno dollar at The Home Depot and had them cut it to fit the size.

Painted brown.


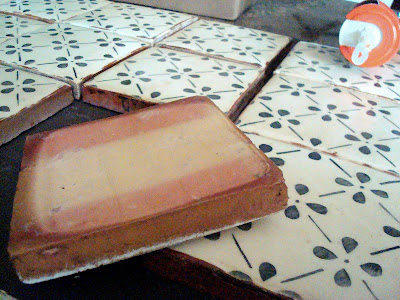
My beautiful, amazing, adorable, totally in love with, tile from Walker Zanger. Are you familiar with Walker Zanger? They have the most amazing tile in the world. You can check out their website HERE. The tile I used if from their hand-made Contessa Line.

(I also saw this tile used in the movie Julie and Julia in Julia Child's kitchen in France that kind of sealed the deal)

I siliconed them to the board, with just 4 little simple dots of silicon so I can take them off, semi-easily if I want ( I hope! )


It was so easy and so fast! I love it!

And... then I needed to hang this Kitchen sign I thought over the hood would be perfect.

I was going to hang it with ribbon but the Industrial Chic'sta in me thought chain would be so much more cuter. I got this chain at Home Depot for .63 cents.


I attached the chain with binder rings.


Ta-da!
I accessorised with vintage potato smashers I collected over the years.
Links

Join  us Saturdays at tatertotsandjello.com for the weekend wrap   up           party!
The DIY Show Off
Related Posts Plugin for WordPress, Blogger...